Shelley: DIY Wreath / “Swag”

Happy Monday Friends!
I’m so excited to introduce you to Shelley, from Crazy Wonderful, who has joined Playdates + Pearls as our DIY & Design contributor! You probably remember her from last weeks guest post where I spilled the contents of my bag over on her blog. If you want to read more about Shelley and the other P+P contributors you can check them out here. They have so much good stuff in store for you!!
She brought her A-Game today with a super simple, and gorgeous, DIY “swag” which I now NEED. Hope you love her as much as I do!
I’m struggling with how quickly Christmas is approaching this year. With all the Halloween candy still around (actually, I’m shocked we still have any with all that I’ve been eating) I feel like it should still be October. But, ready or not, it’s coming!
This year I wanted to do something other than the traditional wreath for our front door. The windows along the front of our house will each have a wreath so putting another on the front door seemed overkill. I decided to go with a swag instead.
If you want to make your own, here’s how I did it!
I found my swag at Hobby Lobby (50% off!). I believe these are meant to be pulled open and draped over a door/entry, but I just kept the long pieces bent down and later bent the wire even more so the long pieces would be closer together.
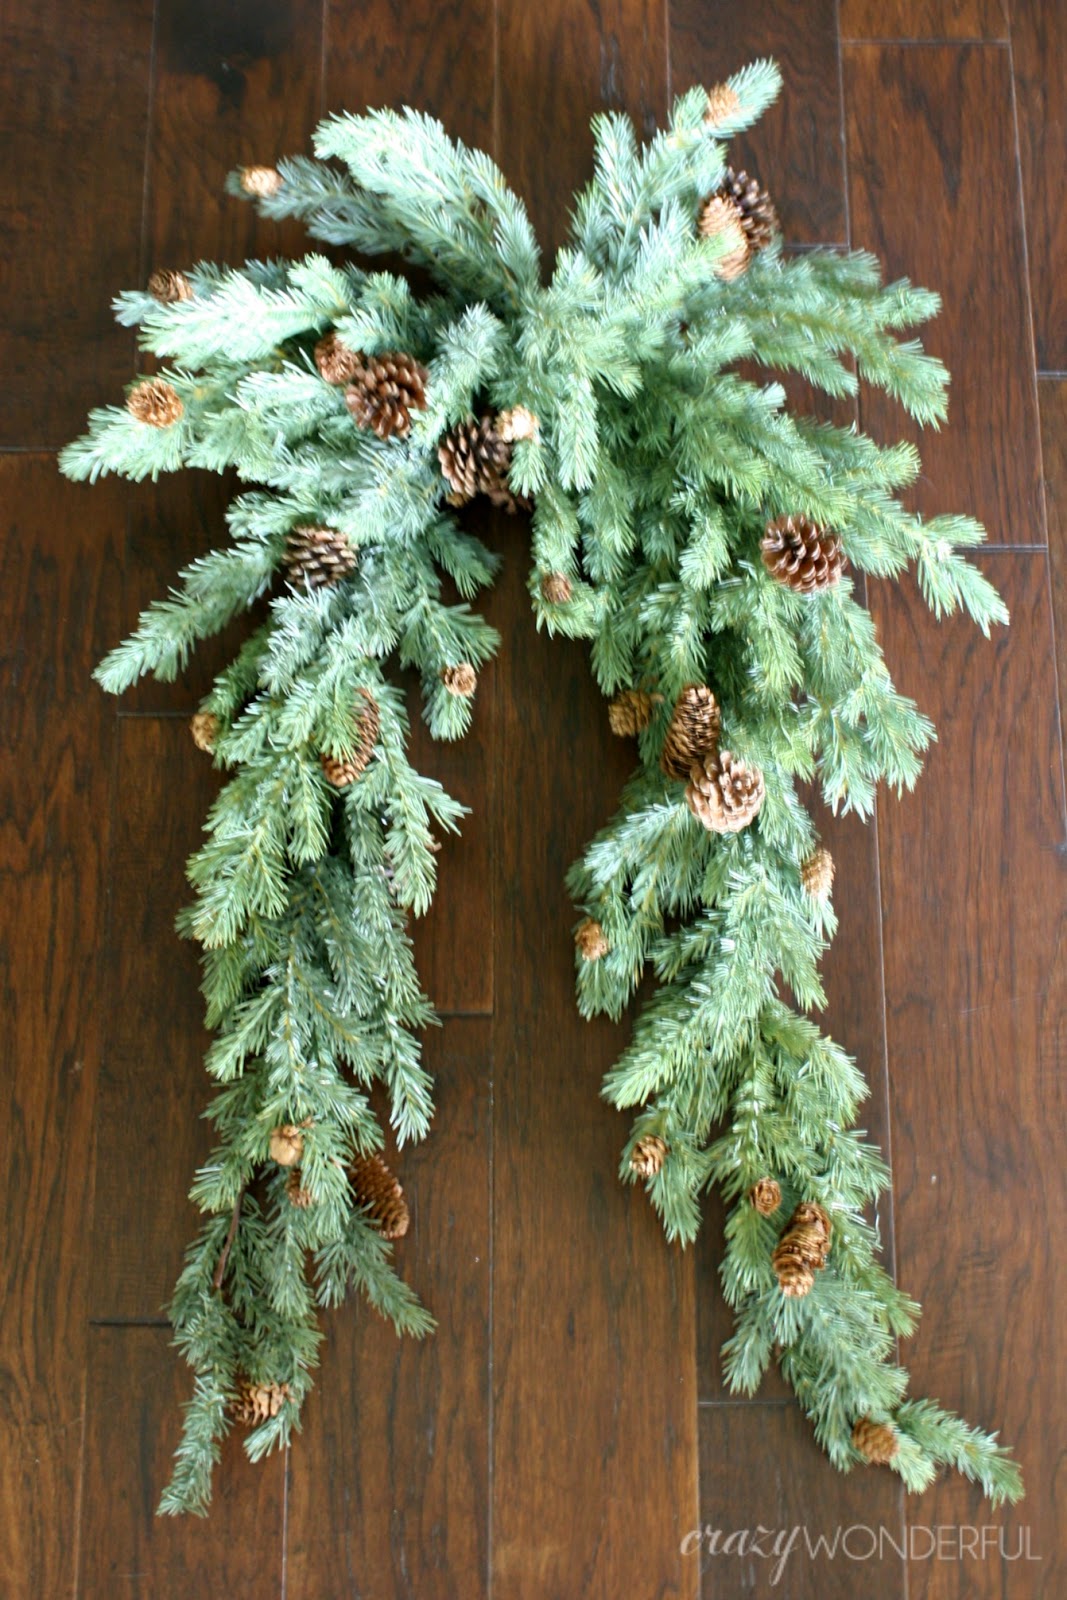
I tied a large burlap ribbon and attached it to the top with floral wire. Leave yourself extra length for the ribbon tails for the next step.
I wanted the ribbon tails to be pinned in place so I wrapped floral wire around different sections of the ribbon and then attached the ribbon to the swag with the remaining length of floral wire. Ignore the white ribbon. I ended up switching it out for the striped ribbon later.


I then stuck in some glittery floral sprays behind the bow and attached some large plastic ornaments to the front. All using more of that floral wire to keep everything in place.
Hang that bad boy up and enjoy!
Once I get all of our Christmas decorations out I’ll run some lit garland around the door to dress it up more.
Here are some other images of swags I’m loving. Most of which make me want to completely do a redo of my own :D This first one in particular I can’t get enough of. They’re HUGE!!!
| via |
These would be simple to put together using cuttings off the bottom of a fresh cut Christmas tree.
| via |
Definitely check out the entire outdoor decor from this house. She even shows you how she did it. I think I’m going to add a strip of ribbon to hang my swag from after seeing this.
| via |
Absolutely adore the simplicity of the pine cones hanging from simple ribbon.
| via |
And this one won me over with it’s stripe ribbon (can’t. get. enough!).
| via |
So what do ya think. Are you going to get your “swag”ger on this year??? I know, lame attempt at a joke but I couldn’t help myself!

DIY Watercolor Art

I like a good DIY. I especially enjoy a super easy, zero construction, toddler involved DIY that I cannot screw-up. Those ones are really my jam, and today I have exactly that for you!

I have a little corner in Harper’s nursery that was in need of some basic art. I didn’t want anything too “loud” that would compete with the other art in the room, so in my mind I envisioned a trio of plainly colored paper…I know, sounds uber boring…but stay with me people. A few days later I saw a picture on Instagram posted by Caitlin Wilson of exactly what I had been envisioning, and she made it look so cool (unlike how I described it in the previous sentence).

DSC_0020

I scored these 3 frames in varying sizes at Michaels in the clearance section. 2 are black, and one is brown, but a little gold paint cures all.

DSC_0022

I had this hanging around from another project, and let’s be honest, free is always better.

DSC_0023

Paint your frames. Or don’t, it’s your call. In my house, gold rules.

DSC_0028

Entertain your toddler while you paint. $1 watercolors for the win!

DSC_0034

Paint 3 canvas boards (or paper) with the colors of your choice. Harpers room is a mix of navy, mint, orchid/neon berry, and coral. Because the art will be positioned over a coral chair, I chose to use the other 3 accent colors.

DIYart Camera died. Sorry for the crappy iphone picture (that looks more like a flip phone pic. Fail.)

Frame & hang. Easy peasy, right? I can’t wait for my new chair and lamp to arrive, and my curtains to be made so I can share a better picture of this little space with all of you. Until then, Camryn has turned this into her “art station”. :-)

XO – Samantha

P.S…Because I always get asked, the kids chairs are the Tabouret Stacking chairs from Overstock.

DIY Curtain Trim

Welcome back!

First off, THANK YOU all for the incredibly kind comments, messages, texts, and calls about our pregnancy news. My heart nearly exploded. I’m so happy to have such a supportive, kind, and kickass group of followers. I say it all the time, but you’ve made my little corner of the internet such a joyful place for me. I’m looking forward to sharing my pregnancy journey with all of you. Right now, I’m bloated, tired, and craving caffeine. I could be used as a floatation device, and my husband and I are becoming more and more afraid of what two children will be like. HA! Get ready for more posts that sounds like that. If you’re a parent on 2+, please leave me regular comments reminding me that I’m not going to be outnumbered, and that two tiny terrorists are not going to deprive me of sleep and ask the words “why?” forever. Those are short term problems, right?

How was your weekend? Mine was pretty good. My husband came home after an entire week away and I was beyond exhausted and thrilled to have him watch Camryn while I napped. :-) It was my sisters birthday on Saturday and we spent some time lounging by her pool and enjoying the “Camryn Show”, aka my toddler running around in her bikini being oh-so-silly. Pictures of that are on my Instagram. Pre-warning: 2 year old in a bikini might be more cuteness than you can handle. You’ve been warned. On sunday I went to get a last minute mani/pedi with my sister and none of our usual places were open, so we tried a new place called Crystal’s (off N. Lamar if you’re in Austin). DO NOT GO THERE!! It was the worst mani/pedi I have EVER had. :-( My nail polish, 8 hours later, is still mushy and peeling off my nails. How is that even possible? I swear they added acetone to the polish too many times or something. I’ve never had to remove my polish and re-paint both hands and feet the same day as having them professionally done. Such a bummer.

In other news, I’ve finished my DIY drapes, and they look fabulous if you ask me.

DIYdrapes.jpg

drapescloseup.jpg Pretty great for a $35 PAIR of 118″ curtains from Ikea, $3 worth of ribbon, and $4 worth of fabric glue. If you want to recreate this look, lay out your drapes and glue your ribbon down 1″ from the edge. All it to dry overnight, and Viola! I used large coffee table books to hold my fabric flat and wrinkle free. Even my husband was impressed with this cheap DIY and what an impact it made. The drapes looks beautiful and expensive and at 118″, they add so much height to our hallway.

If you noticed my fun “Everyday I’m Hustlin’” phone cover, it’s from Mulberry Press Co. I get stopped in the street and asked by strangers about that awesome case.

In addition to finishing my curtains, I also found a drawer pull for my hallway console. Of course it’s from Anthropologie…that place is like crack. The word “no” is non-existent in there.

This knob looks so much better in person. It’s absolutely drawer pull perfection. Once I install it I’ll post a picture for you all.

Until then, have a happy Monday.

XO – Samantha

Matte Nails Using Steam

Hello Lovelies!

Today I’m bringing you a super simple matte manicure using nothing but plain old polish and steam. Yes, you read that correctly, steam. No more fancy matte polishes and top coats. Go bust out a pot and get some water boiling, and find your favorite polish. If you want to multi-task and make your spouse think you’ve been slaving away and cleaning the house, add some essential oils (like eucalyptus) or sliced lemons to your boiling water. Your house will smell amazing!

wash

Step 1. After shaping your nails and cleaning up your cuticles, wash your hands thoroughly.

exfoliate

If you have dry, winter hands, use a pumice to gently exfoliate your hands.

boil

2.|| Start boiling water.

paint

3.|| While you wait for your water to boil, start painting your nails with whichever polish you’ve chosen. I used Formula X by Sephora in Unmistakable, a pale jade color. I’m craving spring!!

steam 4.|| After applying 2 coats of polish, hold your hand over the steam (while the polish is still wet) for 5-10 seconds. Ta-da! Matte nails.

matte nails2 Hope you all have a great day!

XO – Samantha

Hibernating

The indecisive weather here in Austin has forced Camryn and I into hibernation. We’re officially doing nothing that doesn’t involve staying in our jammies all day, snuggling and watching movies, drinking hot cocoa, or playing with toys. I made a “market” which has kept us very entertained. Her imagination runs wild these days, and it’s just so fun to watch her pretend to be a chef serving Mommy lunch, a “farmers market owner” selling me veggies, or my favorite “I’m just Camryn Reese, Mom!” I can’t wait to reuse our market as a lemonade stand this summer, or as a puppet theater when I make a curtain. Daddy’s favorite use is a kissing booth where he can buy smooches for a quarter. :-) DIY for this SUPER easy stand coming ASAP.

Day27option2 Sorry for the crappy iphone quality picture, but tell me that’s not a total cutie hamming it up in her “market”! She got to taste a Crush soda, her first soda ever, which made her grin from ear to ear. I’m going to make little tags that say “I have a CRUSH on you!” to attach to the sodas and give out with our cookies on V-day.

How cute is this “Embrace Messy Hair” sweatshirt from Grey Thread! Messy hair is right.

messyhair

We also did mani’s…

Day28 Rainbow nails made the freezing weather seem not so bad. Camryn always says “Paint my nails Mommy. I want green.” Always green…always. Rainbow was a nice change, but I’d paint those sweet little baby fingers any color, any day.

That’s pretty much our day in a nutshell. Like I said, we’re hibernating.

XO – Samantha

What I’m Loving {Wednesday}

After having been gone for a few days, I wanted to get caught up with some of the things I’ve been loving, and pinning lately. I try to bookmark things that I’ve enjoyed all throughout the week so that I can share them with you on Friday’s Lust List’s, but this week there’s too much to wait.

1.|| This yummy southwest chicken salad from MSK

2.|| Buying one of these “Hustlin” mouse pads for my husband, and another for myself.

3.|| I love these leggings for Camryn

4.|| What a beautiful living room!

5.|| I love this quote.

6.|| My yellow lab, Aly, needs one of these chic little doggy beds.

7.|| Get in my belly. I would trade in my husband for this delicious looking cake. ;-)

8.|| DIY gold lip wine glass.

9.|| I received a bunch of new coffee table books for Christmas and my birthday, and the Kate Spade book was one of them. It’s soooo good you guys. I’m absolutely smitten with it, and it looks so pretty sitting on my table.

10.|| My daughter was given Living Sand as a Christmas gift from my husbands grandparents, and it’s absolutely AMAZING!! Have I mentioned this to you guys already? I’ve been telling everyone I know about it. It’s super easy to clean up, doesn’t stick to anything or dry out like playdough, and has been hours of fun for us. It’s also non-toxic and anti-bacterial. We own the large set, but there’s also a less expensive smaller set. Parents of toddlers, go buy some. You’re welcome!

11.|| I was really sick again all day today, so I lounged around and relaxed in the bath…which looks eerily similar to this one. I’m hoping to be back to myself by tomorrow. I have a long list of my favorite blogs to get back to reading. I’ve discovered a few new bloggers that I’ve really been enjoying, so I’ll share those with you guys soon. Maybe I can get some of them to come by and say “hi”, and tell you a little about their blogs themselves.

I’ll sure be glad when Friday arrives…until then, Happy Hump Day!

XO – Samantha

DIY Lace Elbow Patches

I came across this picture on Pinterest, and well, I fell in love and then realized I could easily DIY something similar. So off I went to Michaels to grab lace & fabric glue. I found one of Camryn’s old’ish sweaters that will be perfect for Valentines, and started DIY’ing away.

This is SO easy, and requires very few items. 1 roll of lace, fabric glue, scissors, and your shirt or sweater of choice.

DSC_0074

Cut your lace into the shape and size you need. Apply glue to sweater, and then place your lace on top. I used a small paint brush to add additional glue on top of the lace, just to seal everything together. The glue dries clear, is flexible, and can be washed (turn garment inside out).

DSC_0076

The glue takes 24 hours to fully set, but I’ll update with a picture of Camryn wearing it tomorrow. This was quick, easy, and cheap, and it will look so cute on V-Day. I’m tempted to go cut up one of my own sweaters and try to replicate the first image now…

Here’s a tutorial for adding wool elbow patches to a shirt or sweater.

Happy DIY’ing. XO – Samantha

UPDATE:

Here are the pictures of Camryn wearing her sweater. :-)

red heart

elbow patches

First Lust List of 2014

Lust List Image

The-Little-Market-Styled-Trunks-7602-434x652 1.|| This beautiful white and brown leather trunk from The Little Market has me swooning.

2.|| I’ve been eyeing this headboard for Camryn’s room.

3.|| We need new light fixtures desperately, and I’ve been loving a few from Restoration Hardware, including this dramatic little gem. I’m loving these for over my bar.

4.|| I mentioned yesterday that my husband and I want to travel overseas again this year, and we’ve been talking about seeing Greece. After looking at pictures, I’m sold! Has anyone been? Do you recommend it? My husband visited years ago, and wants to return.

5.|| I recently started watching the Gossip Girls series on Netflix after one of you suggested it to me, and I’m hooked! My husband will not stop making fun of me, and says it’s a show for young teens, but I highly disagree, there’s some stuff going on in the show that is not at all for young teens. Please leave a comment if you watched this show, and prove my husband wrong!!!

6.|| I saw this picture on Pinterest a few weeks ago, and I can’t stop thinking about changing my hair. Ombre? I have the length and I like the idea of focusing the damage to the ends of my hair so I can chop it off if I get tired of it being bleached. Thoughts?

7.|| If you live in the Austin area, be sure to check out the grand opening party at the new SprATX location on Saturday the 4th!

8.|| I found thinly sliced agate at Homegoods last week and I plan to frame them for my husband office. I’m envisioning 2 stacked frames (similar to photo above) with antlers above. Moth Designs has a great DIY tutorial for framing agate if you want some for your home.

9.|| This kills me.

10.|| How cute is this dress from Mason and the Tambourine? I couldn’t buy it for Camryn fast enough. I wish Candy Kirby Designs would start making dresses, because I’m smitten with her fabrics.

Did you check out yesterdays “Camryn Daily” pic? Our park doesn’t have potties, so I’m always that ghetto mom toting around a kid potty in my car. My house is only 4 houses away from the park, but this mommy is not going to pick up my kid and start running home when she says “I need to potty Mommy!”. Yeah, I lead a really glamorous life. If you haven’t checked out the pics you can see them all here.

Happy Friday!!

XO – Samantha


How To: Wash Your Makeup Brushes

DSC_0312

We all wash our faces daily (at least I hope you do) and we spend so much time and money on our skin care regimens, but so often our makeup brushes get overlooked. Just like we cleanse the dirt and makeup from our skin, we need to regularly cleanse our brushes for the same reasons. Not only are these tools touching your delicate skin on a day-to-day basis, but they’re often times being dipped into your makeup.

These are the brushes I use most frequently, and tend to wash on a weekly basis. I also have a 2 year old who thoroughly enjoys playing in her makeup (aka chapsticks and clean makeup brushes) so I’m often having to wash more makeup brushes than I actually use in a week. Her little face is dirty, so makeup or not, her brushes get cleaned too.

DSC_0319

I am NOT a fan of cleaning my brushes. It’s a chore, just like doing dishes, and often times my brushes will still be damp the next morning, but it’s a necessary evil. If anyone has any tips or tricks to offer, leave me a comment!!

To cleanse my brushes I use Blender Cleanser, which can be purchased through Sephora. You could also use baby shampoo, or other brush cleansers (MAC sells some). I use warm water, a pea sized amount of cleanser in the palm of my hand, and then I swirl my brush in it and rinse. If you’re washing foundation brushes you’ll likely need to repeat this step until the water runs clear. Squeeze all the water from your brush and reshape them, and then lay flat to dry on a clean towel. Smaller brushes will typically be dry within a few hours, but larger brushes will take overnight. Clean a Beauty Blender in a similar fashion by applying a pea sized amount of cleanser to the soiled area of your blender, and lather and rinse until water runs clear. Set on towel to dry.

Here are a few of my favorite makeup brushes & cleanser (which are featured above):

RT-TRAVEL-ESSENTIALS-002 Real Techniques Travel Essentials

I love the domed shadow brush for applying my under eye concealer, and the multi-task brush for my bronzer.

Blender Cleanser

Beauty Blender

Flawless foundation and concealer application.

These 3 amazing items are part of todays GIVEAWAY, valued at over $50! Enter below. Good Luck!

XO – Samantha

a Rafflecopter giveaway

Lust List: 12/6/13 & On The 4th Day of GIVEAWAY!

Well everyone, we survived the week, and now we get to enjoy a little R&R this weekend. Wahhooo! You know what I love most about Fridays? Knowing that I get to sleep in tomorrow morning because my husband will be home and will get up early with our daughter. I volunteer him for morning duties every Saturday. He’s a gem. :-)

Let’s kick this Friday off right with my Lust List, and then Day 4 of my “12 Days of Giveaway”!

Lust List Image

1.|| How Kids Decide Who To Marry (Short & Sweet Article that is sure to make you smile!)

2.|| I love this gift topper tutorial from the blog “The House That Lars Built”

3.|| I was sent a sample of an exfoliator that has officially stolen my heart. It’s the Microdermabrasion Paste from Rodan + Fields. It smells of citrus, warms as it exfoliates, and leaves your skin feeling softer than a babies bum. You guys know I love my face masks, and I will gladly put this in my top 5. It reminds me of Kate Somerville’s Exfolikate, but not as stinky, or green. I’ve had the opportunity to test a few Rodan + Fields products, and I’m really enjoying them. My favorite (daily use) products so far are part of the Redefine line, which are targeted at aging skin. I really appreciate the emphasis on using SPF, and that the package includes an eye cream focused on fighting wrinkles, which sadly, I have. :-( I’ll do a full product review when I’ve finished sampling all the lines. For reference, my skin is combination-dry, and does breakout on occasion. I have a lot of freckles, which make my skin look discolored the older I get (I swear the little bastards are joining together to become one giant freckle!) I love exfoliating products, and brightening products, or anything that helps fight wrinkles. I have deep set eyes, and in the last 2 years I’ve developed fine lines around the inner corners of my eyes, so I’m always on the hunt for a good eye cream. A special thank you to Paula for allowing me to try all of these products out and give my honest feedback and recommendations to all of you. My opinions are my own, as always. :-)

4.|| The perfect appetizer. These make my mouth water just looking at them.

5.|| Speaking of things that make my mouth water…Anyone want a Kahlua Hot Chocolate? Go check out this recipe from Damn Delicious.

6.|| Danielle, from THE EVERYGIRL, shares her fabulous Chicago Apartment.

7.|| My friend introduced me to the amazing world of Pinterest Fails. My husband and I cried laughing in bed the other night looking through them. My favorite part? “Nailed it!”

influental

8.|| Beautiful new “Influence” art by Jen of MadeByGirl would be the perfect addition to any gallery wall, or inspirational piece in your office, or closet. I love that Jen’s art is always classy, and clean, and always adds a touch of glamour to any space.

9.|| When you let your kids play ball inside the house…amazing things {sometimes} happen. Watch this video until the end. Very inspiring.

Day4

10. Day 4 of my “12 Days of Giveaway”!! Win this eclectic collection of holiday gifting items, like a gold glitter journal (great for keeping in your purse and making notes or lists), a gold polka dot bag, gift tags, gold polka dot pillow boxes (perfect for gift cards), red and white striped twine, magnetic to-do list, thank you cards, all occasion “&” cards, and fun pens. I want you to recieve these goodies with plenty of time to use them, so this giveaway will only last 5 1/2 days. All entries will be verified. This entry requires to follow Playdates + Pearls (by e-mail, or on bloglovin’) AND follow Playdates + Pearls on Instagram. All additional entries are optional. Good Luck!

a Rafflecopter giveaway

Oh, and HAPPY FRIDAY LOVES!

XO – Samantha

Follow

Get every new post delivered to your Inbox

Join other followers: